How to Find a Dead Animal Hidden in Your Wall
You know it is there. The smell is unmistakable — a heavy, sweet, rotting odor that gets stronger near a specific section of wall. But walls are large, cavities are narrow, and cutting into the wrong spot means wasted money and unnecessary repairs. Knowing how to find a dead animal in your wall before a professional arrives can speed up the process and reduce costs.
Here is the systematic approach that wildlife removal professionals use, adapted for homeowners who want to narrow down the location before making the call.
Step 1: Map the Odor Gradient
Your nose is your most reliable initial tool. Dead animal odor follows predictable patterns in wall cavities:
- Start at the strongest point. Walk slowly along the wall where the smell is worst. Get close to the baseboard — decomposition fluids settle downward, and the smell is often strongest at floor level, even if the animal is higher in the wall.
- Check outlets and switch plates. Wall cavities are accessible through electrical outlet and switch openings. The smell will be noticeably stronger when you place your nose near these gaps. (Do not remove covers or insert anything into the outlet — just smell near the edges of the plate.)
- Test both sides of the wall. If the wall separates two rooms, check the other side. The smell may be stronger on the side closest to the carcass.
- Mark the hot zone. Use painter's tape to mark the section of wall where the odor is strongest. Most wall-cavity carcasses can be localized to a 2–4 foot section using smell alone.
Step 2: Look for Visual Clues
Dead animals inside walls often leave visible evidence:
- Staining or discoloration — Brownish or yellowish spots on drywall indicate decomposition fluids seeping through. This is one of the most reliable indicators of exact location.
- Moisture or bubbling paint — Decomposition releases significant moisture. Look for paint that appears damp, bubbled, or soft to the touch.
- Fly activity — Blowflies are attracted to decomposing tissue and can detect it through tiny gaps. If flies are clustering around a specific baseboard, crown molding, or light fixture, the carcass is very close to that point.
- Maggot trails — In advanced decomposition, fly larvae may migrate out of the wall cavity through gaps at baseboards or around pipes. Finding maggots on the floor near a wall is a definitive location indicator.
Step 3: Use Your Ears
This step is often overlooked but can be remarkably effective:
- Listen for buzzing. A concentration of flies inside the wall cavity produces a faint but audible buzz. Press your ear against the wall in the suspected area. If you hear a low, steady buzz, you have likely found the spot.
- Tap the wall. In some cases, tapping the drywall near the carcass produces a subtly different sound — slightly duller — due to the presence of the animal and any moisture in the cavity.
Step 4: Consider the Entry Path
Understanding how the animal got into the wall helps predict where it ended up:
- Attic access points — If your attic has signs of animal activity (droppings, nesting material, chewed insulation), the animal likely entered from above and fell or crawled down a wall cavity. In this case, the carcass is often near the bottom of the wall, resting on the sole plate or a fire block.
- Foundation gaps — Rodents entering from below tend to die higher in the wall, having climbed up and become trapped.
- HVAC and plumbing penetrations — Animals follow pipes and ductwork. Check walls adjacent to bathrooms, kitchens, and utility rooms first.
- Previous activity — If you have had prior wildlife issues or heard scratching sounds in a particular wall, that is the highest-probability location.
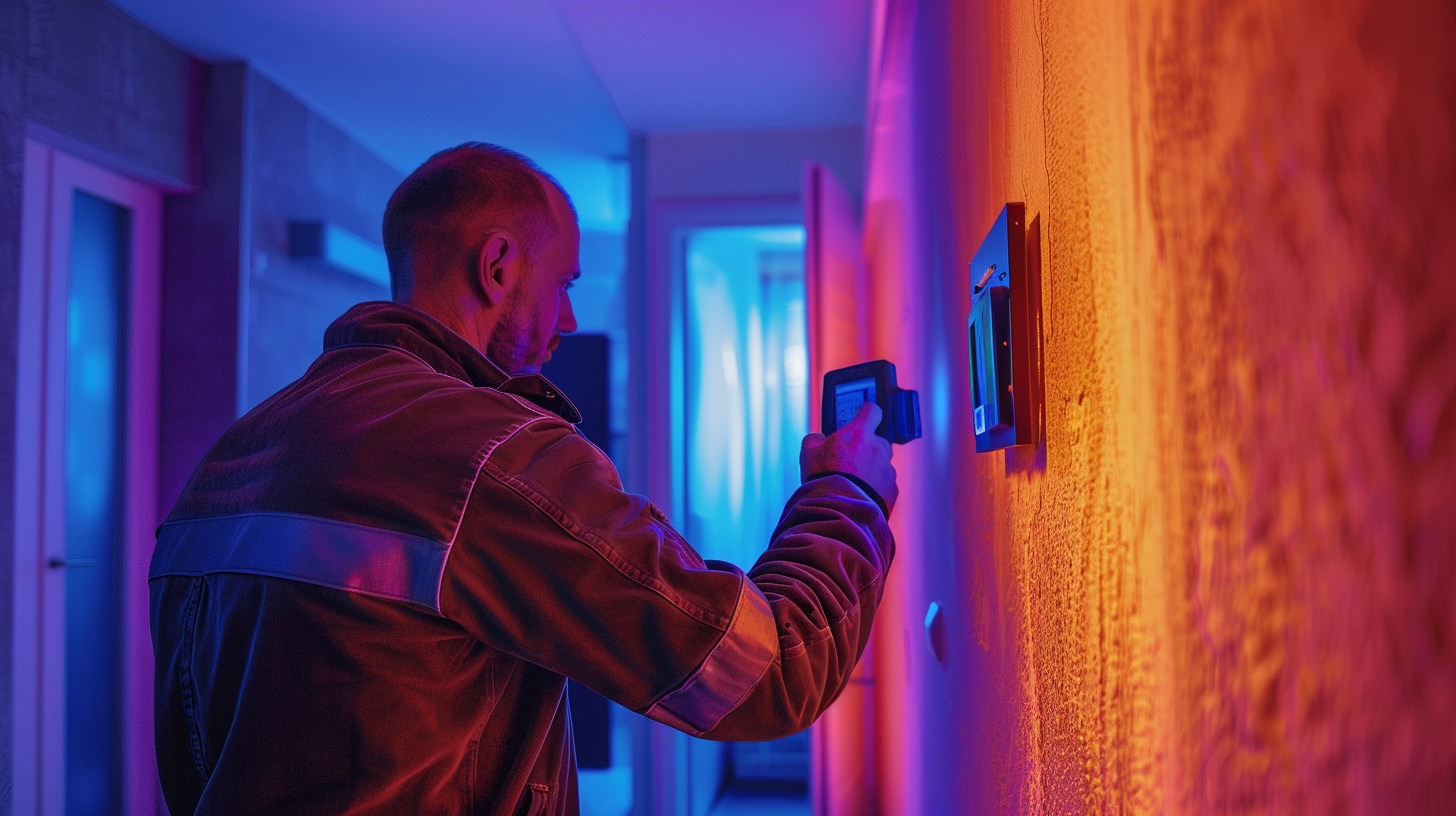
Step 5: Technology-Assisted Detection
If the methods above do not pinpoint the location, two affordable technologies can help:
Thermal imaging — Decomposition generates a small but detectable amount of heat during the active decay phase (first 1–2 weeks). Consumer-grade thermal cameras that attach to smartphones (FLIR ONE, Seek Thermal) cost $150–$300 and can sometimes reveal a warm spot in the wall cavity corresponding to the carcass. Professionals use higher-resolution commercial units that are far more sensitive.
Borescope inspection — A borescope (also called an inspection camera) is a flexible camera on a thin cable. Professionals use these to visually inspect wall cavities through small drilled holes (typically 3/8 inch). You can purchase a basic borescope for $30–$80, but this approach works best when you have already narrowed the location to a specific section.
When to Stop and Call a Professional
You should call a licensed dead animal removal professional if:
- You have narrowed the location but are not confident enough to cut into the wall
- The smell is coming from a wall that contains plumbing, electrical wiring, or HVAC ductwork
- The odor has been present for more than a week and you suspect a larger animal (raccoon, opossum)
- You see signs of secondary damage — staining, mold, or pest activity
- The suspected wall is load-bearing or contains fire blocking that complicates access
Professional wall-cavity extractions typically cost $250–$450 and include locating the animal with commercial-grade equipment, making a minimal access opening, removing and disposing of the carcass, sanitizing the cavity, applying enzyme-based odor neutralizer, and patching the access hole. Most professionals complete the entire process in 1–3 hours.
The Key Takeaway
The more precisely you can locate the carcass before the professional arrives, the smaller the access hole, the faster the job, and the lower the cost. Spend 15–20 minutes using the odor mapping and visual inspection steps above, mark the suspected area with painter's tape, and communicate your findings to the removal team. This preparation routinely saves homeowners $50–$150 on the final bill and gets the problem resolved in a single visit.